In this article we will introduce you to cPanel’s File Manager application and explain how you can make use of it’s key features.
cPanel’s File Manager, as the name suggests, allows you to browse, edit, delete and manage the files associated with your hosting account.
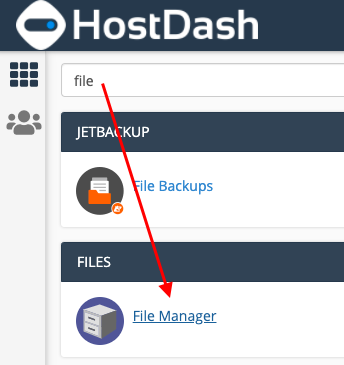
Accessing the File Manager
To access cPanel’s file manager follow the steps below:
- Log in to your cPanel account (For instructions on how to log in to cPanel, click here).
- Using the search function located at the top of the cPanel home screen, search for File and click on the File Manager icon as shown below.
After clicking File Manager, a new tab will open in your browser opening the cPanel File Manager.
Browsing the File System
At first glance the default files on your account may look overwhelming. Thankfully, there is an organizational structure making it easy to adapt to.
When navigating through the File System and using the File Manager keep the following in mind:
- To navigate to and move to another directory or subdomain click on its name in the left sidebar.
- To move up a level in the file system, click Up One Level.
- To expand a directory listing and view its contents, click the + icon on the left sidebar. This will show you the directories and files within that directory.
- To collapse a directory list, click on the – icon located on the left sidebar.
- All of your public facing files will be located in the public_html directory. Any file in public_html will be accessible on the interwebs.
Creating new folders and files
cPanel makes it easy to create new directories/folders and files through the file manager.
Creating a new directory in cPanel
To create a new folder (or directory) follow the steps below:
- With the File Manager interface open click on the + Folder button located at the top left of the action menu bar.
- In the popup interface, under New Folder Name enter the name of your desired folder.
- Under New Folder will be created in, ensure the correct path has been set for where you would like the new folder to be located.
- Click on the Create New Folder button and cPanel will create the new folder in the location you set.
Creating a new file in cPanel
To create a new file in cPanel follow the steps below:
- With the File Manager interface open, click on the + File icon located in the top left of the header action bar.
- Under New File Name, enter the name of the file you would like to create.
- Under New file will be created in, make sure the path is correctly set for where you would like the new file to be located.
- Once ready, click on the Create New File button and cPanel will create the file in the location you set.
Other File Actions
cPanel allows you to perform various actions on files including but not limited to copying, moving, renaming and deleting. To perform one of these actions, follow the steps below:
- While in the cPanel file manager, locate the file (or files) you would like to perform any actions on and click on them once so they have a blue background.
- Using the action bar located above the file explorer, click on the action you would like to perform as detailed below:
- To copy a file, click on the Copy button. Enter the desired destination for the copied file and click Copy File(s).
- To move a file, click on the Move button. Enter the desired destination for the file to be moved to and click Move File(s).
- To rename a file, click on the Rename button. Enter the new name for the file and click Rename File.
- To delete a file, click on the Delete button. Click on the Confirm button and cPanel will move the file to the Trash folder.

Did you find this article helpful?
If you found this article helpful then you will love our support! Get blazing fast cPanel Hosting and experience the HostDash difference today!
Check out our cPanel Hosting plans today.
Have a Question?
We're here to help!
Email Us
Send us an email with your questions and we'll get back to you momentarily.
Send us an EmailSubmit a Ticket
Chat live with a member of our sales team to discuss your next project.
Submit a ticket