In this article, we are going to show you how you can add an email account to the default Mail application on MacOS.
Step 1: Open the Apple Mail Application
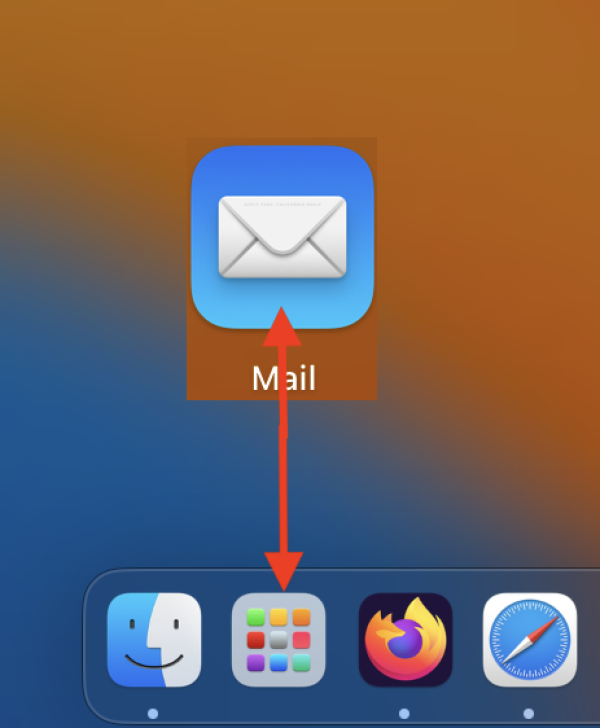
The first step to connecting your email account to Apple Mail is to open the email application. You can do this by clicking on the Launchpad on your taskbar, followed by clicking on the Mail app.
Step 2: Adding an Email Account
With the Mail app open, it is time to add your first email account. From the top left navigation menu, click Mail followed by Add Account as shown below.

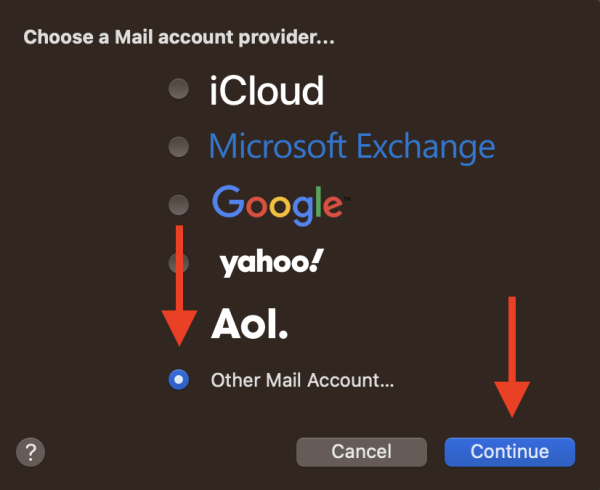
A popup will appear to determine the type of account you would like to create. From the popup interace, select the option Other Mail Account and then click Continue as shown below.
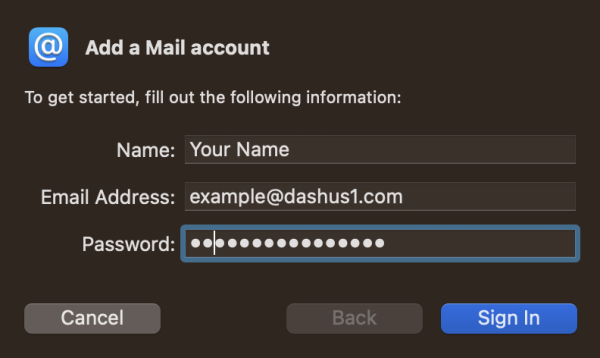
You should now see an interface which will prompt you to enter your account login details:
- Name: Enter your name
- Email Address: Enter the email address of the email account you'd like to add
- Password: Enter the password for the above email account
Note: Email account passwords differ from your cPanel account password. If you are unsure of your email address password please click here for a guide on resetting your email account password.
Once ready, click Sign In as shown below.
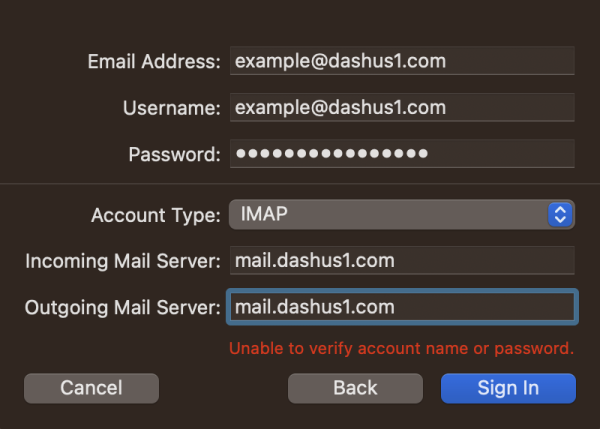
The final step to adding an email account is to configure a few server settings. Fill in the presented form as shown below:
- Email Address: This should be pre-filled in though if not, enter the email address of the account you would like to add
- Username: Enter the email address of the email account you would like to add again
- Password: This should be pre-filled in though if not, enter the password for this email account
- Account Type: IMAP
- Incoming Mail Server: Enter mail.yourdomain.com (replacing yourdomain.com with your own domain name)
- Outgoing Mail Server: Enter mail.yourdomain.com (replacing yourdomain.com with your own domain name)
Note: Be sure to replace yourdomain.com with your own domain name in the above incoming & outgoing mail servers.
The end result should be as shown below.
Once ready, click Sign In, followed by clicking Done
And that is it! Your email should now be syncing through to your email client on MacOS Apple Mail.

Did you find this article helpful?
If you found this article helpful then you will love our support! Get blazing fast Shared Hosting and experience the HostDash difference today!
Check out our Shared Hosting plans today.
Have a Question?
We're here to help!
Email Us
Send us an email with your questions and we'll get back to you momentarily.
Send us an EmailSubmit a Ticket
Chat live with a member of our sales team to discuss your next project.
Submit a ticket