In this tutorial we are going to show you how you can automatically import your emails into a Gmail account for archiving purposes. This may prove especially useful if you are running out of disk space or are approaching the file limits set for your hosting package, when combined with cPanel's ability to delete emails older than a specified timeframe.
Each email address you import will be able to have a specified label which you can leverage to keep your account organized. You will also be able to leverage labels to filter out emails sent to a specific address enabling you to import multiple email accounts into a single Gmail account.
Step 1: Verify your Gmail Storage Limits
Gmail serves as part of a collective suite of tools all of which utilizes a single storage allocation. For example, if you have a 100 GB storage limit Gmail, Google Drive, Google Photos, and more will all share that single 100 GB allocation.
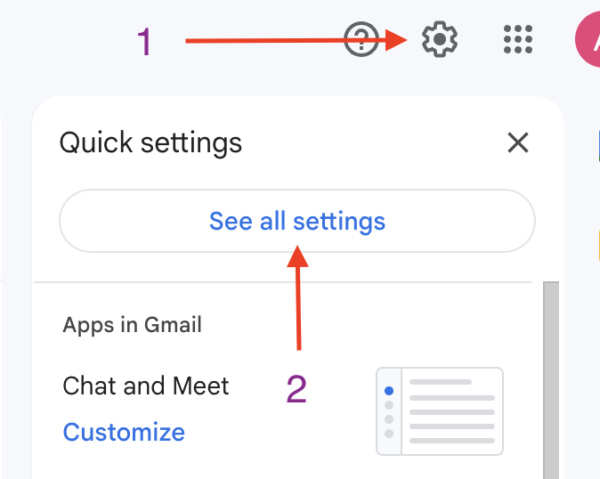
You will want to ensure you have enough storage for the amount of emails you wish to import into Gmail. To check how much storage you have allocated to your account, and how much of that is being used, log into your Gmail account and click on the Cog icon located towards the top right corner.
From the side menu that appears, click on the 'See all settings' link as shown in the image below.
Under the General tab, scroll all the way down the page and at the very bottom you will see your storage limit. If you do not have enough storage for the emails you wish to import, click on your disk space limit where you can purchase up to 2 TB storage.
Step 2: Importing Emails Into Gmail
Now that you have verified or purchased enough storage for your emails, go back the settings page by clicking on the Cog icon in the top right corner, followed by clicking on the See all settings link.
From the settings navbar located towards the top of the page, click on Accounts and Import.
Scroll down until you see the option Import mail and contacts and click on the blue text link called Import mail and contacts.
A popup box will appear prompting you to enter the email address you'd like to import emails from. Enter the first email address of the account you'd like to import emails from and then click on the Continue button.
After clicking continue, you will need to enter a few details about your account in order for Gmail to be able to connect to your email account. Fill in the form as described below:
- Enter your password: Enter the password of your email account.
Note: Each email account on your HostDash account will have its own unique password. This is not your cPanel password, nor is it your Gmail account password. - POP Username: Enter your email address. For example, [email protected]
- POP Server: Enter the server hostname your website is hosted on. If you are unsure of the server hostname, feel free to contact our support team and we'll be happy to help.
- POP Port: Click on the Edit button and select port 995. In the option that appears, click on the Use SSL checkbox.
Once the form has been filled in, click on the Continue button.
After clicking continue, Gmail will verify the details provided and will then provide you with numerous import options. Select the options as detailed below:
- Import mail: Select (check) this option
- Leave a copy of retrieved message on the server: Select (check) this option
- Archive incoming messages (Skip the Inbox): Leave this option deselected (Unchecked)
- Add label to all imported mail: Enter a label you'd like to use to easily reference the emails of this email account
Once ready, click on the Start import button.
When you click on Start import, Gmail will start the process of importing all of emails. If you have a significant number of emails, it may take a while for everything to be imported (up to several days).
Repeat the above step for all of the email accounts you'd like to import into Gmail.
Step 3: Deleting Emails From Your HostDash Server
WARNING: It can take Gmail several days to import your emails. You must wait for Gmail to complete that process otherwise cPanel will delete the emails before Gmail imports those into your account.
Once Gmail has imported all of your emails you can safely have automate cPanel to delete your emails after a certain period of time. If you have a lot of emails, we recommend deleting emails older than 6 months.
To get started, log in to your cPanel control panel and click on the Email Disk Usage application. From the account drop down menu, select the email account you'd like to delete emails from.
Next to each respective folder (Inbox, Sent etc), click on Manage and a drop down menu will appear. From the top down menu, click on Custom Query and in the box that appears enter:
savedbefore 26weeks
Finally, click on the blue Delete Permanently button to begin the email deletion process.

Did you find this article helpful?
If you found this article helpful then you will love our support! Get blazing fast Shared Hosting and experience the HostDash difference today!
Check out our Shared Hosting plans today.
Have a Question?
We're here to help!
Email Us
Send us an email with your questions and we'll get back to you momentarily.
Send us an EmailSubmit a Ticket
Chat live with a member of our sales team to discuss your next project.
Submit a ticket