Before you can create a cPanel account for a client, you would first need to create a package within WHM. The package will define certain limits and features your client websites will have access to. This can be useful if you want to sell different sized packages to your own clients.
Creating a package in WHM
To create a package in WHM follow the steps below:
1) Log into your WHM control panel (Need help logging in to WHM?)
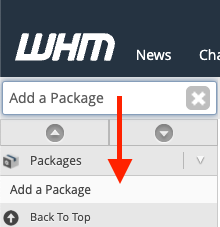
2) Using the search box located on the left side (directly under the WHM logo), search for Add a Package
3) From the left side navigation menu, click on the menu item Add a Package
4) In the Package Name box, enter a unique package name. For example, Startup.

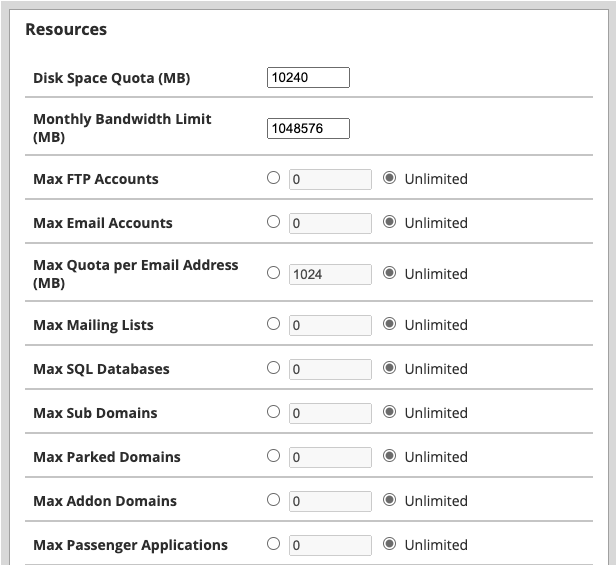
5) In the Resources section, you will be able to define the resource limits for each website associated with this package. Enter your desired limits or select the Unlimited radio toggle next to the available options to not have a limit for that feature.
Disk Quota (MB):
Enter the maximum amount of storage a website on this package will be able to utilize in MB.
Monthly Bandwidth (MB):
Enter the maximum amount bandwidth / data traffic websites on this package will be able to consume per month in MB.
Max FTP Accounts:
Enter the maximum number of FTP accounts your clients on this package will be able to create.
Max Email Accounts:
Enter the maximum number of email accounts your clients on this package will be able to create.
Max Email Lists:
Enter the maximum number of emailing lists your clients on this package will be able to create.
Max Databases:
Enter the maximum number of databases your clients on this package will be able to create.
Max Sub Domains:
Enter the maximum number of sub-domains (sub.example.com) your clients on this package will be able to create.
Max Parked Domains:
Enter the maximum number of parked domains your clients on this package will be able to create.
Max Addon Domains:
Enter the maximum number of addon domains your clients on this package will be able to create.
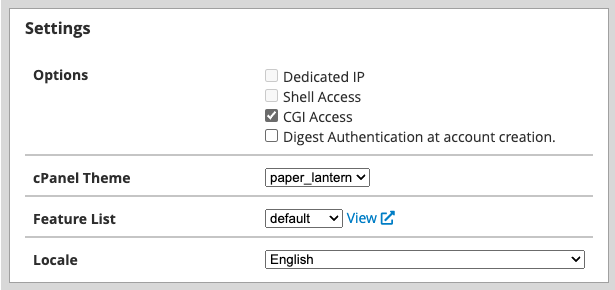
6) Under the Settings section you will be able to define certain features and options clients on this package will have access to.
Dedicated IP:
This field is disabled by default and can’t be selected.
Shell Access:
This field is disabled by default and can’t be selected.
CGI Access:
Select this box if you would like websites under this package to execute CGI scripts.
cPanel Theme:
Select the default theme to be enabled for your clients cPanel accounts on this package. By default this is set to the latest stable cPanel theme and is the recommended theme by HostDash.
Feature List:
Feature lists will set which cPanel features are enabled and disabled. For the best user experience, we recommend leaving this to the default option.
Locale:
Select the default cPanel language for websites on this package.
7) Once ready, click on the blue Add button.
Congratulations! You have created your first WHM package. If you’d like to create more packages you can repeat this process for each package you would like to create.
Other WHM Tutorials Articles
Monthly Business Growth Tips
Receive monthly top tips on how to grow and scale your web business.
No Spam. Unsubscribe Anytime.
Have a Question?
We're here to help!
Email Us
Send us an email with your questions and we'll get back to you momentarily.
Send us an EmailSubmit a Ticket
Chat live with a member of our sales team to discuss your next project.
Submit a ticket