By leveraging the hosts file located on your computer, you will be able to override the results of a DNS query which effectively instructions your computer to always load your website from a specific server. This is useful if you are migrating between web hosting providers and want to verify if everything is working correctly, before updating your nameservers.
While there are a few methods you can use to preview your website before changing your nameservers, the most accurate way would be to edit the hosts file on your computer.
Preparing to Preview Your Website
Before editing your local hosts file the first thing you will need to do is obtain the IP address associated with your hosting account. You can obtain the information by logging into your cPanel account and looking at the right sidebar for the ‘Shared IP Address’.
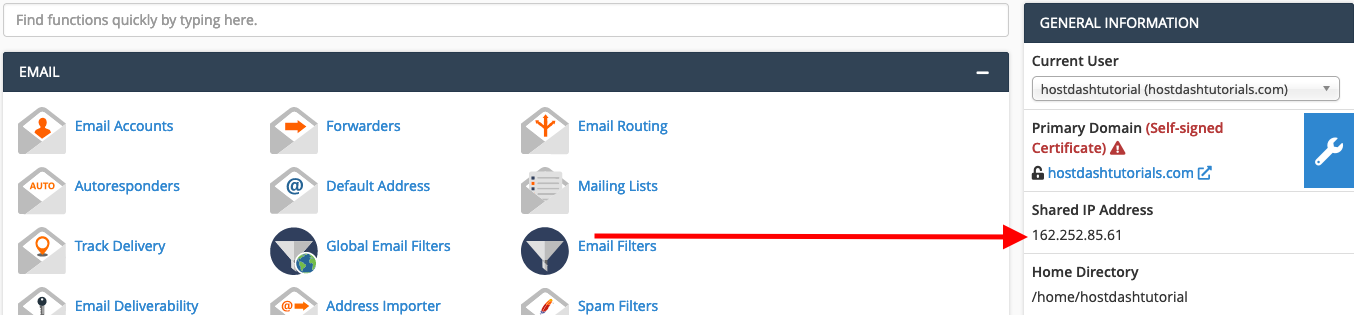
Once you have located your account Shared IP Address, copy and paste it into a notepad or text editor for the next steps.
MacOS: Editing Your Local Hosts File
In MacOS, the local hosts file is located at: /etc/hosts. We will modify this file to preview your website on another server. These instructions are applicable for all versions of MacOS.
- Open Spotlight search by pressing Command (⌘) + Space
- In the search box, enter Terminal and click on the Terminal application that appears

- Open the hosts file using your favorite text editor such as Nano or VI and pasting the below command. In the example below, we will be using Nano.
sudo nano /etc/hosts - You will be promted to enter a password. This password is used for your MacOS account and not your hosting account. When ready, enter your computers password and press enter.
Note: You will not see your password as you type it though once you have typed your password, press enter and you should be able to proceed to the next step. - Scroll to the end of the file (by pressing the down arrow on your keyboard) and add your website entries by formatting it as:
IP yourwebsite.com www.yourwebsite.com
For example:
##
# Host Database
#
# localhost is used to configure the loopback interface # when the system is booting. Do not change this entry.
##

162.252.85.61 mywebsite.com www.mywebsite.com
162.252.85.61 2ndwebsite.com www.2ndwebsite.com- Once you have added your entries, save the changes by pressing
Control + Xand then pressYto confirm saving the changes. - Flush your DNS cache by pasting the code below into your terminal:
dscacheutil -flushcacheAnd that is it! You can now preview your website on the new server by opening your website as you normally would in your browser.
When you are done testing your website on the new server remember to remove the above entries in your local hosts file.
Windows: Editing Your Local Hosts File
The following applies to Windows 8 & Windows 10.
In Windows, the local hosts file is located in: C:\Windows\System32\Drivers\etc\hosts.
- On your Windows computer, press the Start button
- In the search box of the start interface, search for Notepad
- In the search results, right click Notepad and select Run as Administrator
- A box might popup confirming administrative privilages, if so, click Yes
- From Notepad, open the file located in:
C:\Windows\System32\Drivers\etc\hosts
If you do not see the hosts file in the \etc\ directory, try changing Text Documents (*.txt) to All Files in the bottom right corner of the open file interface
- At the very bottom of the document, add the entries for your website. For example:
# localhost name resolution is handled within DNS itself.
# 127.0.0.1 localhost
# ::1 localhost

162.252.85.61 mywebsite.com
162.252.85.61 www.mywebsite.com- Once you have made your changes, click on File -> Save
- Restart your browser and navigate to your website as you normally would.
And that is it! You are now viewing your website from your HostDash hosting account on your Windows computer.
Method 2: Browser Based Site Previewer
If you do not wish to modify your local hosts file you can use a website or service which replicates the same functionality, such as through skipdns.link.
While browser-based site preview tools are easier, they are not as accurate as modifying your local hosts file. For the most accurate preview of your website we recommend using the methods mentioned above.
To get started follow the steps below:
- In your preferred web browser, open the website: https://skipdns.link/
- In the Domain or URL field, enter your domain name without a prefix. For example, if your website is https://example.com, enter example.com for the website name
- In the Server Address box, enter the IP address you copied in the previous step
- Click on the blue Fingers Crossed button
And that is it! SkipDNS will now provide you with a special link that you can use to preview your website.
Conclusion
By now you should have been able to preview your website without needing to update the nameservers of your domain. This allows you to test your website before any missed issues are presented to your website visitors.
If you used the local hosts file method and would like to undo those changes, simply repeat the instructions above but remove the entries you added instead of adding them.
If you experience any issues updating your local hosts file don’t hesitate to reach out to our support team for assistance.
Other Getting Started Articles
Monthly Business Growth Tips
Receive monthly top tips on how to grow and scale your web business.
No Spam. Unsubscribe Anytime.
Have a Question?
We're here to help!
Email Us
Send us an email with your questions and we'll get back to you momentarily.
Send us an EmailSubmit a Ticket
Chat live with a member of our sales team to discuss your next project.
Submit a ticket